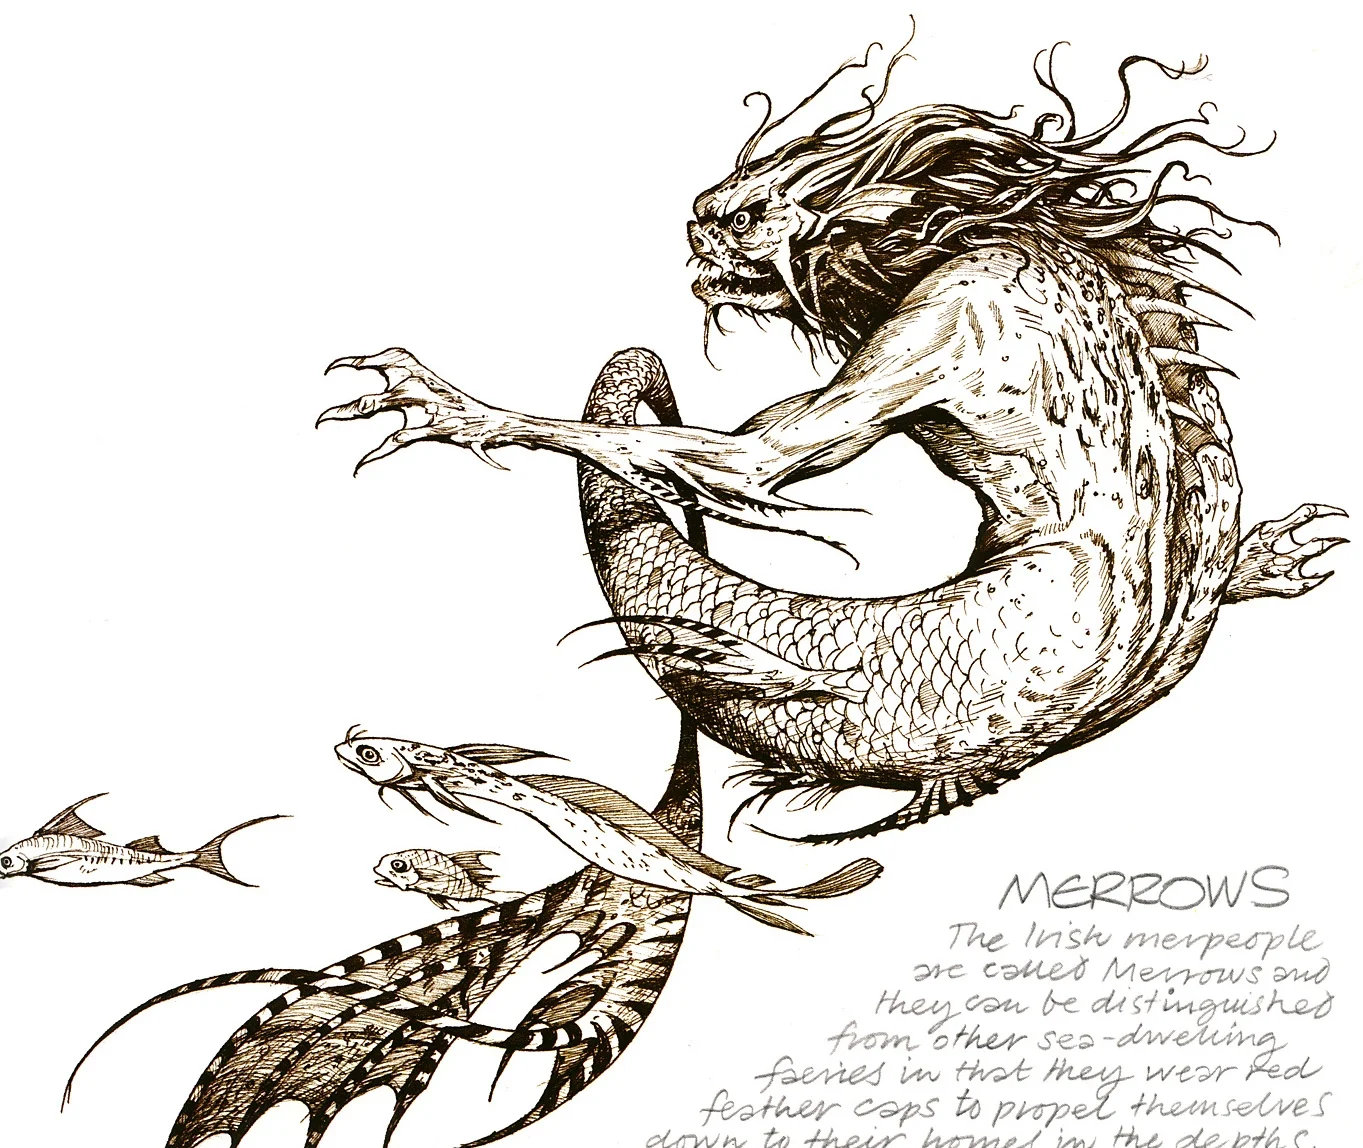
The classic fantasy art book 'Faeries' by Brian Froud and Alan Lee was a childhood favorite for me, and I like to show this book to my students whenever I am teaching fantasy art. Since there is a great deal of interest in this genre locally, and many students tell me that they weren't sure where to get started with drawing out their ideas, here is a quick tutorial where I will re-draw one of my favorite mythical characters, the Merrow -- or perhaps more aptly, the evil mermaid -- as shown here in a sketch by Alan Lee.
When getting started with a creative idea, I think it is perfectly acceptable to refer to a source image that sparks your imagination. You don't have to copy the image exactly, but you can use it as a guide to work out your ideas. Grab a fresh sheet of paper, some sketch pencils and some compressed charcoal or your favorite drawing medium.

Start by placing down the foundations of your creature. Where are the joints and where is the center of gravity? I find continuous line sketching and 'connecting the joints' like they were locations on a map are two great ways to break out of drawing modes that can result in two-dimensional, or flat-looking drawings.
Be sure to use an HB or other sharp and light sketch pencil, so that your sketch can be worked over. Alternately, you can sketch on a digital paint application on a foundation layer.
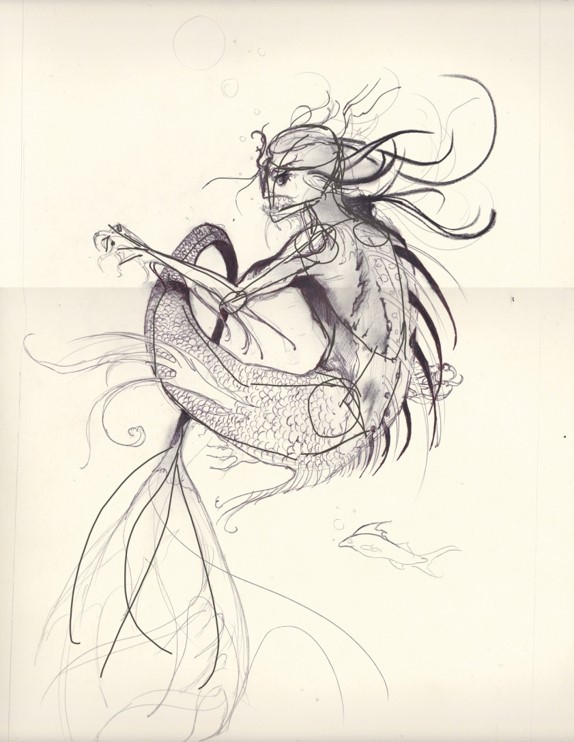
Once you have mapped out the position of your subject on the page, you can start to build up some context with a darker pencil -- compressed charcoal and a smudge pencil are great for this. Try not to overdo the shading at this stage. Instead, try to pick only a few of the darkest contours in a few crevices. When it comes to shading, less is more and it forces you to consider nuance and detail in the early stages.

Now the fun part begins -- building up a bit of detail! I would recommend starting with only one color and using it as a base to establish a palette of other colors from. If drawing by hand, a mix of soft and compressed colored charcoal will work great. Alternately, you can do what I did here and scan the image, then use a digital airbrush to lay over some more contrast and tone.
I think it's important to emphasize the some of the best fantasy art uses limited colors in order to keep the imagery convincing -- it also helps keep the focus on subject and execution.
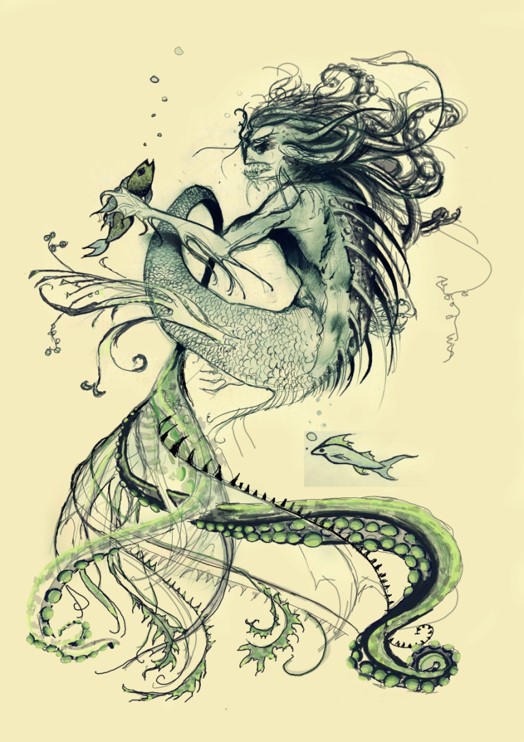
Here I have begun to lay over some highlights for detail and better shading distinctions. Try to pick a color that is complementary and close in hue to your undertones. In this instance, my foundation color was a dark teal, so I am using a light green to bring out the illumination. Keep in mind that you can suggest a great deal about textures by how you blend colors into one another. I want my mermaid's tale to look slimy, so I have reflective strips where the light would be coming off from.

Now, time to elaborate on some details and extend out the midtones. You can do this by adding in a few more colors, just enough so that there is plenty for the viewer's imagination to build on. I am using Photoshop here, so I have built up the detail on the layers panel by stacking the details and light tones overtop of the shadows and undertones.
Note that you can achieve pretty much the same results by using the same techniques on the iPad with Procreate, however you will be more restricted by the graphics and memory capabilities of a handheld device.

And finally, the best part if you are going digital -- you can play around with the color curves of the various layers of your drawing to get some great color distributions and bring out the tones however you see fit. I've decided to make my Merrow a little more red and purple than my original sketch would have allowed.
And there you have it! You've drawn your first fantasy creature and hopefully you have had a bit of fun too.
I am running my first Digital Fantasy Art Course at CIT Solutions next month and this tutorial is an introduction to the kinds of techniques we will cover.
Course Dates:
Sat 26 Aug – 16 Sep
enrollment code | RED2500
10am – 12pm | 5 sessions | CIT Reid
Tue 10 Oct – 7 Nov
| RED2501
6pm – 8pm | 5 sessions | CIT Reid
For more information : CIT Solutions Short Courses
All you need to get started for this class is an iPad and the Procreate Drawing app which can be downloaded for 10$ -- and is an *excellent* introductory software which can ease you into more advanced programs such as Adobe Photoshop (which I also teach privately and in group classes along with the rest of the Adobe Software Suite).
Thanks for reading this tutorial and I hope it was helpful for you!
=).